Standardized approach
Luigi Boni
Colin Sietses
Joep Knol
A submesocolic approach allows fast and safe dissection and has better oncological results. Although a lateral-to-medial approach is used in most open colectomies a medial-to-lateral dissection is preferred by most laparoscopic colorectal surgeons.

(Copyright Dr. Joep Knol)
Realizing that the medial dissection method has some important potential advantages, an International Consensus Conference sponsored by the European Association of Endoscopic Surgeons (EAES) issued a statement recommending that laparoscopic colectomy be undertaken using the medial-to-lateral method. The dissection can mostly performed blunt and is aided by CO2 insufflation. The only retraction needed is the upward elevation of the mesentery.

Both for mobilisation and for resection of the splenic flexure (anastomosis after low rectal resection) most surgeons prefer a medial-to-lateral approach.
Potential pitfalls in this dissection are injury to the duodenum or pancreas, devascularisation of mobilized colon and bleeding at VMI or other vessels.
Standardisation of the technique may help surgeons to avoid complications.
The aim of the following video is to show tips, tricks and traps in splenic flexure mobilisation. Using “slow motion” and “color effects” we try to focus on the crucial steps of this procedure. To our knowledge this is the first surgical video ever in which colorizing effects were used: this video was awarded as "Best Surgical Video of 2012" by the ACS.
Patient Positioning and Operative Room Setup
A proper patient position is the key to facilitating operative maneuvers and preventing complications such as nerve and vein compression, and traction injuries to the brachial plexus. Therefore we prefer to position the patient on a vacuum “trauma” mattress in combination with adequate padding. The use of this mattress facilitates both Trendelenburg and reverse Trendelenburg with enough support of the shoulders.
The patient is placed supine, in the modified lithotomy position, with legs abducted and slightly flexed at the knees. Both patient’s arms are alongside the body although the left arm can be placed at a 90° angle.
The surgeon is on the right side of the patient . The first assistant is at the lower right side of the table. The second assistant stands at the lower left side of the patient and the scrub nurse stands between the patient’s legs . The laparoscopic unit with the main monitor is located on the upper left side of the table, a second monitor is placed above the patient’s head.
Cannula Positioning
Inflation of the abdominal cavity can be started by using the Veress needle in the left subcostal area or by using an “open” technique.
The first cannula (5 or 10 mm), which is used for the optical device, is positioned on the upper right side of the umbilicus or right through the umbilicus. Two operating cannulae (5 mm) are introduced, one at the junction between the umbilical line and the right midclavicular line, and the other in the subcostal area on the right side. The surgeon is using these two entry ports during the entire procedure. A fourth (5 mm) cannula is placed on the left midclavicular line, at the level of the umbilicus. This cannula accomodates an atraumatic grasper for lifting the mesocolon during the medial to lateral dissection and retracting the transverse colon when performing the lateral mobilization.
If the splenic flexure mobilization is performed as part of a low rectal resection an additional 12-mm operating cannula is placed in the right iliac fossa on the midclavicular line to allow the introduction of a linear stapler device. This cannula can also be used for the splenic flexure mobilization if necessary.
Technique
Exposure
Most surgeons prefer the use of a 30° camera in laparoscopic colorectal procedures.
Throughout the entire procedure the patient is placed in moderate reverse Trendelenburg position and tilted right side down. An atraumatic instrument passed through the left cannula grasps the parietal peritoneum of transverse mesocolon and lifts it up to the left subphrenic region. This maneuver in addition to passive action of gravity provides an excellent view exposing the duodenum and VMI. Now the surgeon can place the small bowel loops on the right side of the patient.
Phase I: Submesocolic dissection from medial to lateral
The surgeon is using the canullae on the right side of the patient.
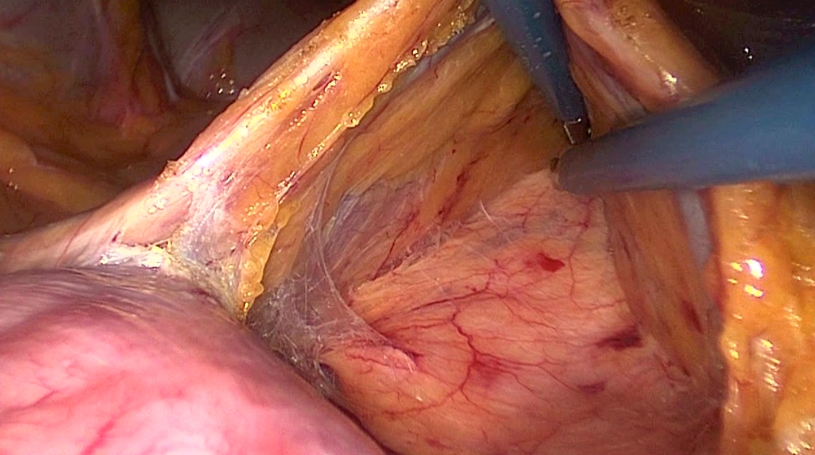
The first step is to divide the attachments to the duodenum and identify the VMI. The VMI is orientated horizontally by manipulating the 30° camera. In a line parallel to and just under the inferior mesenteric vein dissection is started from medial to lateral. By identifying Gerota’s fascia and staying in the submesocolic plane an almost bloodless dissection can be performed.
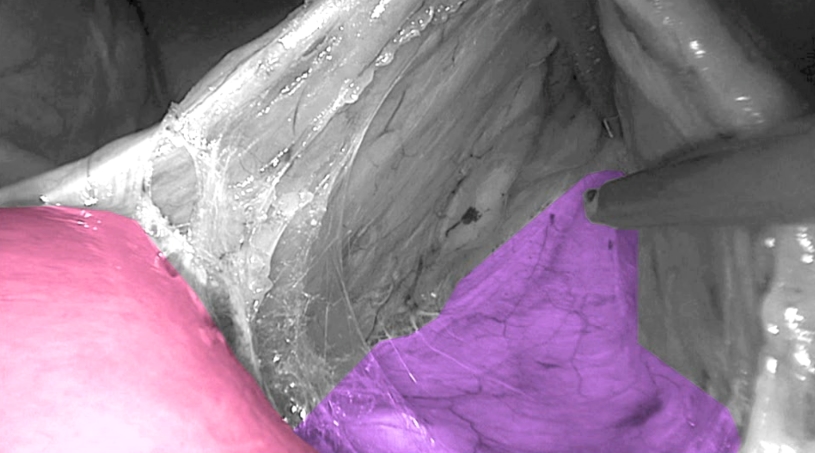
Toldt’s fascia in purple and Duodenum in pink.
(Copyright Dr. Joep Knol)
The incision is enlarged to both sides to create a nice window.
The VMI serves as a “bridge” to work under.
The dissection is continued untill the descending colon is reached. This facilitates lateral mobilization of the splenic flexure and simplifies dissection of the greater omentum.
On the left/cephalad side of Gerota’s fascia care must be taken not to dissect under the pancreas. As a next step the VMI is divided close to the lower border of the pancreas after using clips for ligation or coagulation with a bipolar device.
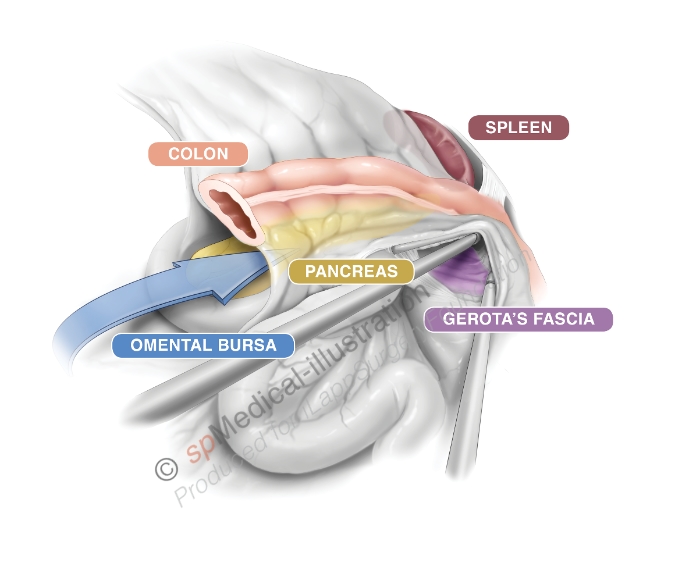
Copyright Dr. Colin Sietses
Now at the upper border of the pancreas a small window is made through the mesentery to gain entry into the lesser sac. The stomach becomes visible. Both windows can now be connected leaving the transverse mesocolon intact and performing a dissecting on the surface of the pancreas.
For this disssection the fusion fascia as described by Toldt is divided. A thin layer of parietal peritoneum is left on the pancreas.
For this dissection the second assistent is lifting the mesocolon to show the bursa while the surgeon’s left hand is at the lower border of the pancreas.
The mobilisation is continued as far laterally as possible finally identifying the descending colon again.
Phase II: Completion of splenic flexure mobilization
The second assistant now grasps the greater omentum and lifts it up. The transverse colon is pulled medially and caudally by the surgeon. The omentum is seperated from the colon using a biploar device. By this dissection the lesser sac is entered from above the colon. Stomach, pancreas and Gerota’s facia become visible again.
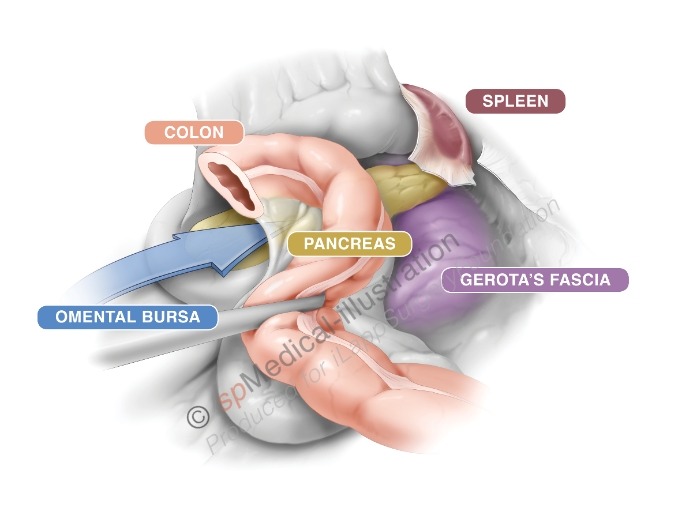
Copyright Dr. Colin Sietses
Mobilisation of the splenic flexure then is continued in a sequence of retraction and dissection. To finalize the complete splenic flexure mobilisation the lateral attachments are dissected free.
Of course great care should be taken not to injure the spleen.
Mobilisation of the splenic flexure is more difficult in obese patients but a standardized approach is still crucial.
Sergio Castorina en Joep Knol show a standardized dissection in an obese patient